Basics of Containers with Docker
Last updated on 2025-07-09 | Edit this page
Estimated time: 45 minutes
Overview
Questions
- What is a Docker image?
- What is a Docker container?
- How do you start and stop a container?
- How do retrieve output from a container to a local machine?
Objectives
- Explain the difference between a Docker image and a Docker container
- Retrieve a Docker image from the cloud
- Start a Docker container running on a local machine
- Use the command line to check the status of the container
- Clean the environment by stopping the container
Introduction
Containers, like virtual machines, allow us to effectively simulate running another computer within our own machine. Why would we want to go through this process of running one computer within another. A few situations where containers are especially useful are:
- You want to use software that is incompatible with the operating system on your machine.
- You want to use a program that has lots of dependencies, which you do not want to manage.
- You want to run analyses on a new set of data with identical settings as a prior study.
Instructors should feel free to add their own examples in the introduction, to help your learners appreciate the utility of containers. Providing your own use case of containers helps lend authenticity to the lesson.
As an example, one of this lesson’s creators received regular requests to convert GIS data files from one format to another. There is a program written in C++ that will do this, but he did not know (or want to know) if the program would run on his computer. There is a Docker container that contains this program and all the dependencies needed for it to run. He uses the Docker container to do the file conversions without needing to install (and keep up to date) all of the requirements for this C++ program to run.
Images versus containers
There are two big pieces of the container world: images and containers. They are related to one another, but they are not synonymous. Briefly, images provide the plans for making a container, and a container is similar to a virtual machine in that it is effectively another computer running on your computer. To use an analogy from architecture, images are the blueprints and containers are the actual building.
If you are a fan of philosophy, images are for Platonists and containers are for nominalists.
Considering the differences between images and containers…
Images are
- Read-only
- Contain instructions (in a file called a “Dockerfile” - we talk about Dockerfiles later in the lesson)
- They do not actually “do” anything
Containers are
- Modifiable (while running)
- Can include files and programs (like your computer!)
- Can run analyses or web applications (and more)
Challenge 1: Images versus containers
You instructor introduced one analogy for explaining the difference between a Docker image and a Docker container. What is another way to explain images and containers?
Several analogies exist, and here are a few:
- An image is a recipe, say, for your favorite curry, while the container is the actual curry dish you can eat.
- “Think of a container as a shipping container for software - it holds important content like files and programs so that an application can be delivered efficiently from producer to consumer. An image is more like a read-only manifest or schematic of what will be inside the container.” (from Jacob Schmitt)
- If you are familiar with object-oriented programming, you can think of an image as a class, and a container an object of that class.
Wait, are container images the same as virtual machine images?
Well, no and yes. Virtual machine systems and container systems really are two different things. You cannot use a virtual machine image to start up a container, nor can you use a container image to start a virtual machine. But for both containers and VMs, an “image” is a file with a blueprint for creating a separate computer system within another computer. In both cases, the image serves as a snapshot of a starting point for a virtual machine or a container. For the rest of the lesson (which focuses on containers), we will use the term “image” to refer to a container image.
Working with containers
One thing to note right away is that a lot of the work of running containers happens through the command line interface. That is, we do not have a graphical user interface (GUI) with menus to work with. Instead, we type commands into a terminal for starting and stopping containers.
For the purposes of this lesson, we are going to use a relatively lightweight workflow of using a container. Briefly, the steps of using a container are:
- Retrieve the image we would like to use from an online repository.
- Start the container running (like turning on a computer).
- Interact with the container, if the container has such functionality (some containers are just programmed to run without additional interaction from users).
- Check the status of the container.
- Upon completion of whatever task we are using the container for, stop the container (like turning off the computer).
Steps 1, 2, 4, and 5 are all associated with a specific docker command:
- Retrieve image:
docker pull - Start container:
docker run - Check status:
docker ps - Stop container:
docker stop
The instructions included in the two episodes on containers assume that learners are using the virtual machines described in prior episodes. However, the following Docker instructions can all be run on any computer that has an internet connection and has Docker installed. You can find more information about installing Docker at the Carpentries’ Containers lesson.
Retrieving images
The first step of using containers is to download a copy of the image you would like to use. For Docker images, there are multiple sites on the internet that serve as sources for Docker images. Two common repositories are DockerHub and GitHub’s Container Registry; for this lesson, we will be downloading from DockerHub. The nice thing is that we do not have to open a web browser and manually download a file - instead we can use the Docker commands to do this for us. For downloading images, the syntax is:
docker pull <image creator>/<image name>Where we replace <image creator> with the username
of the person or organization responsible for the image and
<image name> with the name of the image. For this
lesson, we are going to use an image that includes the OpenRefine software. OpenRefine is a
powerful data-wrangling tool that runs in a web browser.
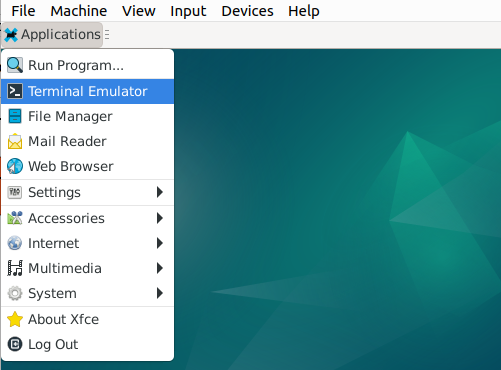
To run this command (and all subsequent Docker commands), we will be using the command-line interface (CLI) in our virtual machines. Open the terminal window by clicking the computer screen icon in the lower-left corner of the virtual machine window.
If you are not using a virtual machine, or if you are using a different virtual machine than the one introduced in previous episodes, you may need to open a command line terminal a different way. Searching for an application called “terminal” on most systems will tell you what the name of the program is to run a command line terminal.

Once the command line terminal is open, type the command to retrieve the OpenRefine image:
docker pull easypi/openrefineAfter typing in the command, press “Enter” and Docker will download the image from DockerHub. You should see output that tracks the progress of the download.

Uh oh. If you tried to run the command above, you might have encountered an error like:
permission denied while trying to connect to the Docker daemon socket at unix://
/var/run/docker.sock: Get "http://%2Fvar%2Frun%2Fdocker.sock/v1.47/containers/js
on": dial unix /var/run/docker.sock: connect: permission denied
The reason this happens is that the docker program requires
Administrator-level authorization to run. If the user does not have that
level of access by default, the command above will be denied. We can get
around this by adding the command sudo right before each
call to docker. So, if you received the “permission denied”
error, update the command to
sudo docker pull easypi/openrefineAnd press “Enter” to run the command. You will likely be asked for
the user password. If you are running this in a virtual machine, it will
be the same password you used to log in to the virtual machine. If you
are running this on your own machine, you would use the password for
your user account. Note for the remainder of this lesson, note you will
always need to add the sudo part whenever you call
the docker command. There is another way to allow access to
Docker commands without requiring the use of sudo and you
can read about them at https://docs.docker.com/engine/install/linux-postinstall/.
By default, the command docker pull will only look for
images on DockerHub; if you want to download images from another source,
such as the GitHub Container Registry (GHCR), you need to indicate this
in the docker pull command. Specifically, we add the source
information immediately before the namespace argument. So
if we wanted to download the Docker image from the official OpenRefine project on GitHub,
we would run
docker pull ghcr.io/openrefine/containerswhere ghcr.io indicates the source of the image is the
GHCR.
Starting an image
You now have an image of a Docker container on your machine. This
means, thinking back to our architecture analogy, you have the
blueprints and now it is time to actually make the thing (“the thing” in
this case being the running container on your machine). To start a
container running from an image, we use the docker run
command, passing the name of the image and any additional information.
In our case, we will need to provide information on how we can interact
with the container by setting the ports (we will see later how we use
this information). In the command-line interface, run:
docker run -p 3333:3333 easypi/openrefineBreaking down this command, there are three key parts:
-
docker run: tells docker to start running a new container -
-p 3333:3333: tells docker we will use the port 3333 on our local machine to talk with port 3333 on the running docker container -
easypi/openrefine: is the name of the image from which to build the container
There is a good chance you will see a variety of messages, including
some that look like errors. However, these are not going to interfere
with our lesson, so we will ignore them for now. Remember, if (and only
if) you receive the “permission denied” error message, you need to add
sudo at the very beginning of the line.
The messages you are likely to see may end with:
08:07:39.496 [  refine] Sorry, some error prevented us from launching the browser for you.

Point your browser to http://*:3333/ to start using Refine. (11ms)
This is telling us that the container wanted to open a web browser, but for some reason it was unable to do so. That is OK - we will open the web browser ourselves later in the lesson.
What are these “ports”? Why 3333?
One of the great things about containers (and virtual machines) is
that they are isolated from the host computer they are running on. So if
something goes really wrong in the container, it will not affect your
laptop. However, if we want to interact with a running container, this
isolation presents a challenge. To allow the host and the container to
interact, we open a line of communication between the two, using
specific points of contact (the “ports”, in this case). We need to tell
docker which port number to use on the host machine and which port
number to use on the container. The creators of the container have
already specified the second of these (they did this when they created
the image); in this case, they opened port 3333 on the container. To
make our lives easier, we will use the same number port (3333) on our
host machine to connect to the container. To generalize, when we run the
docker run command, and we want to allow communication
between the host and the container, we use the following syntax to
connect ports:
-p <host port number>:<container port number>.
In this case, this ends up being -p 3333:3333. We
could use a different port number for the
<host port number>, but we are constrained to use the
same <container port number> that the creators of the
image chose. That is, we could use -p 2121:3333, but not
-p 3333:2121. You can find more information in the docker
documentation for ports.
Status check
At this point, our container is running. Or at least it should be.
How can we check? In order to see which containers are running, we will
use the docker ps command. Because the container we just
started is running in the terminal window where we issued the
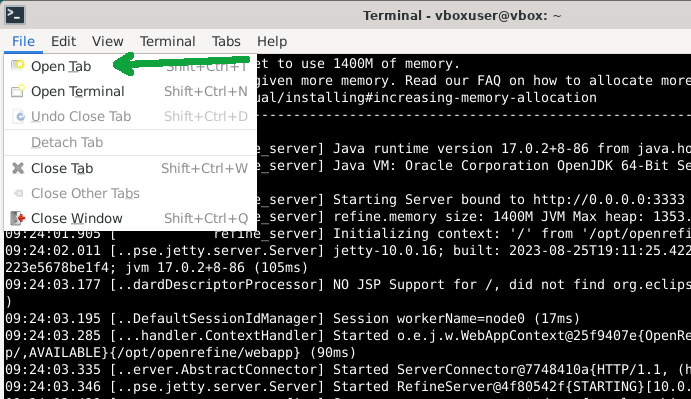
docker run command, we will need to open a new terminal
tab. We can do this in the terminal File menu, selecting the Open Tab
option (File > Open Tab).

In this new terminal window, type the following and press “Enter”:
docker psYou should see a table print out in the terminal window. Note that if
your windows are narrow, the output will wrap around the screen and be a
little difficult (although not impossible) to read. If you find this is
the case, you can make your terminal (and possibly your virtual machine)
windows wider, then run the docker ps command again. The
output should look something like:
$ docker ps
CONTAINER ID   IMAGE                COMMAND                  CREATED         STATUS         PORTS                                       NAMES
e1e174015296   easypi/openrefine    "/app/refine -i 0.0.…"   9 seconds ago   Up 8 seconds   0.0.0.0:3333->3333/tcp, :::3333->3333/tcp   epic_nobel
$
Although the value in the first and last columns (CONTAINER ID and NAMES, respectively) will likely be different for everyone. The important columns to note are:
-
CONTAINER ID: A unique identifier for this container. You can have multiple containers based on the same image running simultaneously, and they will all have different values forCONTAINER ID. -
IMAGE: The name of the image this container is based on. -
STATUS: This will indicate if a container is running (it will say something likeUp 5 minutes, which means it started running 5 minutes ago) or if it has stopped running (the message will beExited (143) 7 seconds ago).
So now we see that our container is running and we are ready to actually use the OpenRefine program.
Using the container
The first thing we need to do is download the sample data we are going to work with in OpenRefine. In a the web browser on the virtual machine, enter the URL https://bit.ly/lc-article-data. This should either download a CSV file or present you with a webpage of the CSV data. If the latter (you see a webpage of the data), download the data as a CSV file. Because you are working in the Virtual Machine, this download should happen within the VM. These data are 1,001 records of Open Access published articles. Note the following instructions for using OpenRefine are adapted from the Library Carpentry lesson on OpenRefine.
Note if you are not using a virtual machine, the CSV file will install on your local machine.
We now need to open OpenRefine, so open a new tab in the web browser that is running on your Virtual Machine, and enter the following in the URL bar: localhost:3333. You should now see the OpenRefine program in your web browser.
Start by loading file we downloaded into OpenRefine.
- Click Create Project from the left hand menu and select “Get data from This Computer” (these options may already be selected).
- Click Choose Files (or ‘Browse’, depending on your setup) and locate the file which you have downloaded called doaj-article-sample.csv.
- Click Next >> where the next screen gives you options to ensure the data is imported into OpenRefine correctly.
- Click in the Character encoding box and set it to UTF-8, if it is not already set to UTF-8.
- Leave all other settings to their default values.
- Click the Create project >> button at the top right of the screen. This will create the project and open it for you.
Next we will clean up one part of the data.
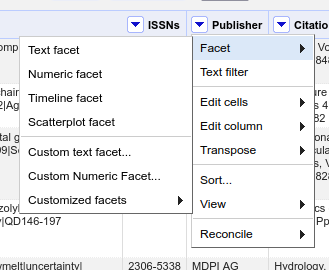
- Click the dropdown triangle on the Publisher column.
- Select the Facet > menu item.
- Select Text facet in the submenu.

- Note that in the values there are two that look almost identical - why do these two values appear separately rather than as a single value?
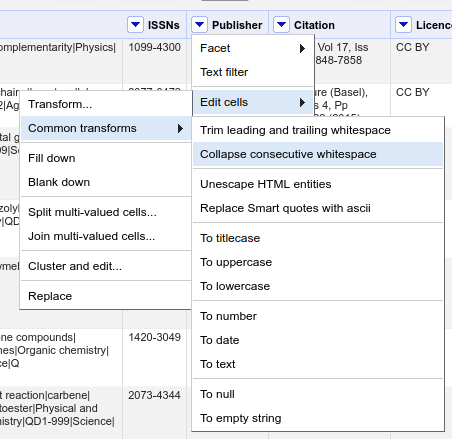
- On the publisher column use the dropdown menu to select Edit cells
> Common transforms > Collapse consecutive whitespace.

- Look at the publisher facet now - has it changed? (if it hasn’t changed try clicking the Refresh option to make sure it updates).
Finally, we can export this cleaned version of the data to a new file.
- In the top-right corner of OpenRefine, click the Export dropdown menu.
- Select Comma-separated value.
- Note an updated version of the file, called doaj-article-sample-csv.csv has been saved on the Virtual Machine.
From this point, the easiest way to move the file somewhere else (like onto your computer), is to move the file to the cloud (e.g. Google Drive, Box, etc.) and download it from there.
Stopping the container
Now that we are finished working with OpenRefine and our file is on
our local machine, we can stop the container. Stopping the container is
equivalent to turning off a computer, and we will use the command
docker stop to shut the container down. Before we do,
though, we need to find the ID of the container that is running
OpenRefine. This is because the docker stop requires that
ID so it knows which container to stop. To find the container
ID, we again use docker ps to provide us with a table of
all the running containers. When you run docker ps, you
should see a familiar table, with most information identical to what we
saw before, but with the time information updated in the
CREATED and STATUS columns:
$ docker ps
CONTAINER ID   IMAGE                COMMAND                  CREATED         STATUS         PORTS                                       NAMES
e1e174015296   easypi/openrefine    "/app/refine -i 0.0.…"   9 minutes ago   Up 9 minutes   0.0.0.0:3333->3333/tcp, :::3333->3333/tcp   epic_nobel
$
The first column, CONTAINER ID has the information we
need in order to stop the container from running.
What if the table is empty? That is, what if after running
docker ps, you see
$ docker ps
CONTAINER ID   IMAGE     COMMAND   CREATED   STATUS    PORTS     NAMES
$
This means you have no containers currently running. You will not
need to use the docker stop command because the container
has already been shut down.
The syntax for docker stop is:
docker stop <CONTAINER ID>where we replace <CONTAINER ID> with the actual
string of letters and numbers that identify the container. So on my
machine, to stop the container, I will run
docker stop e1e174015296The container ID on your machine will almost certainly be different from the one on my machine. If they are the same, I suggest you go buy a lottery ticket now.
Challenge 2: Checking the status of containers
We saw before that we could check the status of running containers by
using the command docker ps. What happens when you run the
same command now? What about when you run the same command with the
-a flag?
-
docker pswill show the status of all running containers. If you have no containers running, and you probably do not at this point of the lesson, you should see an empty table, like:
$ docker ps
CONTAINER ID   IMAGE     COMMAND   CREATED   STATUS    PORTS     NAMES
$ -
docker ps -awill show all containers that are running or have been run on the machine. This includes the container that we stopped earlier.
$ docker ps -a
CONTAINER ID   IMAGE                COMMAND                  CREATED         STATUS                       PORTS     NAMES
e1e174015296   easypi/openrefine    "/app/refine -i 0.0.…"   20 minutes ago      Exited (143) 2 minutes ago                determined_torvalds
$
Note the date information (in the CREATED and
STATUS fields) and the container name (the
NAMES field) will likely be different on your machine.
Challenge 3: Order of operations
Rearrange the following commands to (in the following order) (1) start the OpenRefine container, (2) find the container image ID of the running OpenRefine container, and (3) stop the OpenRefine container.
docker stop <container ID>
docker run -p 3333:3333 easypi/openrefine
docker psdocker run -p 3333:3333 easypi/openrefine
docker ps
docker stop <container ID>- Containers are a way to provide a consistent environment for reproducible work.
- Use
docker pullto copy an image to your machine - Use
docker startto start running a container - Use
docker psto check the status of running containers - Use
docker stopto stop running a container
